
DeepSeek Clone
Documentation
Template Configuration
Welcome to the guide for using the DeepSeek Clone template. This guide is designed to help you make the most out of your purchase and ensure a smooth experience in setting up and customizing your chatbot solution. Follow the step-by-step instructions provided in each section to effectively utilize the features of the template. Let’s get started!
1) Acquiring the Template
To start using the DeepSeek Clone template, you’ll first need to ensure you have an account on Bubble.io. Here’s how you can acquire the template and set up your initial application:
Create a Bubble.io Account:
- If you don’t already have an account, visit Bubble.io and sign up.
Purchase the Template:
- Once your account is set up, purchase the DeepSeek Clone template through the following link: Purchase Template.
Create Your Application:
- After purchasing, Bubble.io usually creates a new application using the template automatically. If this does not happen:
- Go to the Bubble.io homepage.
- Click on Create an app.
- In the popup, look for the dropdown labeled Start from a template.
- Select the DeepSeek Clone template from the dropdown.
- Enter a title for your new application and click Create.
- After purchasing, Bubble.io usually creates a new application using the template automatically. If this does not happen:
Congratulations, you have completed the first step!
2) Adding Essential API Keys
From this point forward, it’s recommended to follow these steps on both the test (development) and live versions of your application. Note that your application must be subscribed to a paid Bubble plan for the functionalities to work as intended.
Ensure Your Application is on a Paid Plan:
- Subscribe your application to a paid Bubble plan if you haven’t done so already.
Access the Plugin Settings:
- In the editor, navigate to the “Plugins” section.
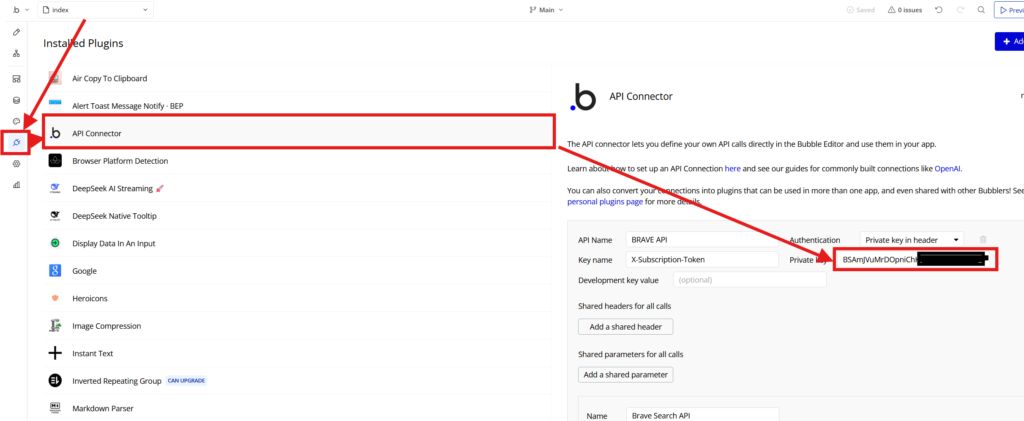
- Select the API Connector plugin and then expand the “BRAVE API” section. You should see fields similar to those shown in the screenshot 1 provided.
Add Your BRAVE API Key:
- Locate the “X-Subscription-Token” field.
- Enter your BRAVE API Key in the following format:
YOUR-BRAVE-API-KEY.
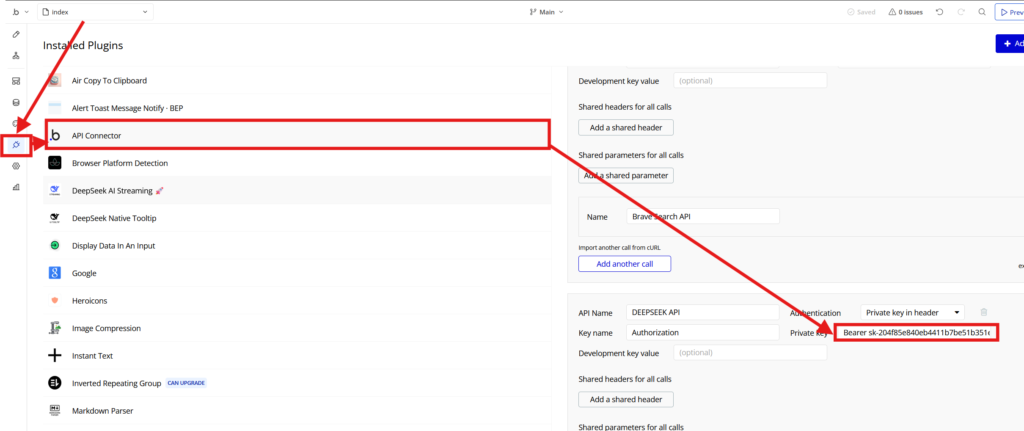
Add Your DEEPSEEK API Key:
- In the API Connector, collapse the “BRAVE API” section and expand the “DEEPSEEK API” section.
- Similarly, in the “Private key” field, enter
"Bearer YOUR-DEEPSEEK-API-KEY"(ensure it starts withsk-...). - (Screenshot 2)
Congratulations, you have completed the second step!
Screenshot 1 :
Screenshot 2 :
3) Purchase the License for Our "DeepSeek AI Streaming" Plugin
To ensure the proper functioning of your template, you must purchase a license for the DeepSeek AI Streaming plugin. Follow these steps to complete the purchase:
Access the Plugin Marketplace
- Open your Bubble editor.
- Navigate to the Plugins section.
- Locate and select DeepSeek AI Streaming from the list of installed plugins (see Screenshot 3).
Purchase the Plugin License
- A red message will appear stating:
“This plugin is a paid plugin, please click here to buy a license.” (see Screenshot 3). - Click on the message, which will redirect you to the purchase page.
- Complete the payment process. The plugin costs $10.
📌 Important: This plugin is mandatory for the template to function. Without it, the template will not work at all.
Congratulations! You have successfully completed this step. Proceed to the next section to continue the setup.
Screenshot 3 :

4) Modifying General Platform Information
This step involves updating the general information for your platform, including the company name that owns the platform, the name of the platform or AI, the names of any derivative versions of your AI, and the platform’s logo. We have made these variables dynamic within the template, so you only need to change the information once to apply the updates across the entire platform.
- Access the Data Section:
- In the Bubble editor, navigate to the “Data” section.
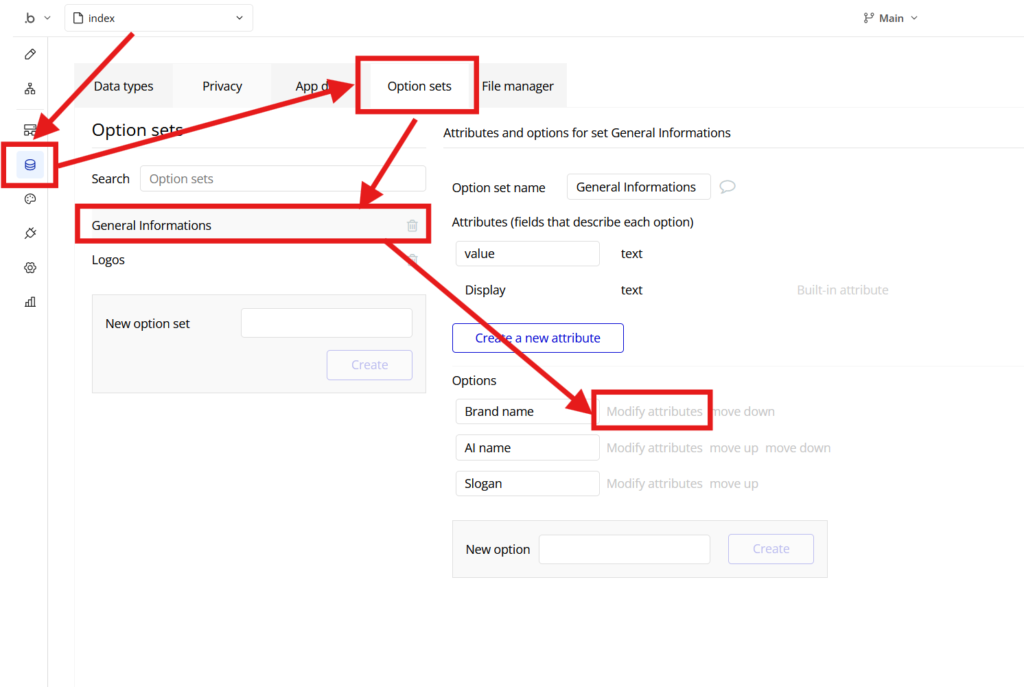
- Modify General Information or Logos:
- Click on Option sets.
- Select General Informations or Logos depending on what you need to update.
- Find the piece of information you want to modify and click on Modify attributes next to it, as shown in screenshot 4.
Congratulations, you have completed Step 4!
Screenshot 4 :
5) Publishing the Platform to Live and Creating an Admin Account
After completing the first tree steps of this guide, you’re ready to publish your platform to the live version and create your admin account.
Deploy to Live:
- In the Bubble editor, click on Main in the top right corner.
- Select Deploy to Live. After the deployment, a popup will appear.
- Click on Go to Live Site in the popup.
Create Your Account:
- On the live site, you may see a popup stating “Your session has expired.” Click on Login and create your account on the platform.
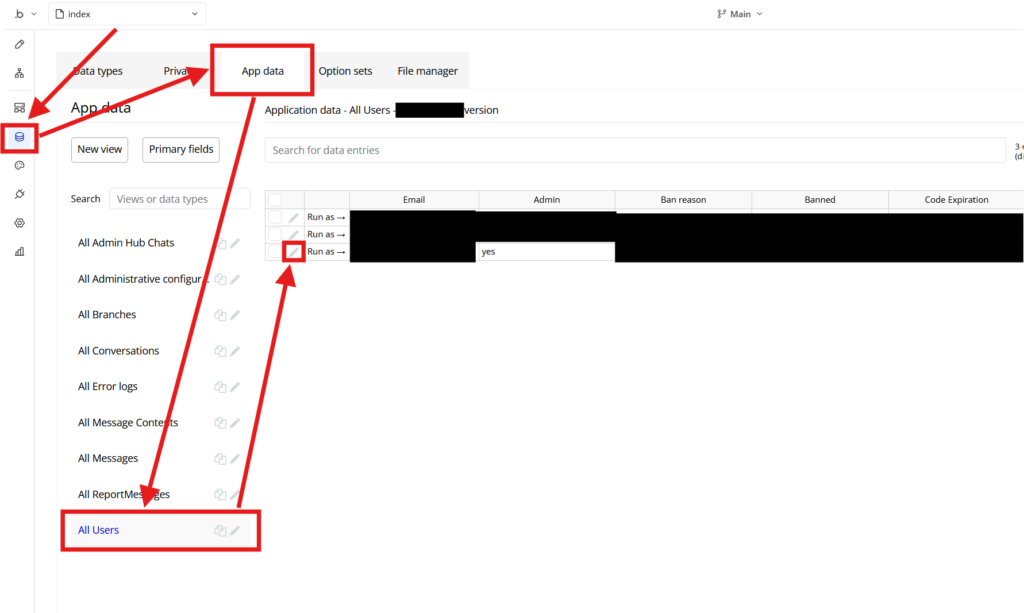
Set Up Admin Access:
- Return to the editor and switch to the live version as shown in screenshot 5.
- Navigate to Data and then App Data as shown in screenshot 6.
- Select All Users. Find the account you just created and change the “Admin” field from no to yes.
Verify Admin Access:
- Go back to the main page of the live site and open the menu in the bottom left corner.
- You should see a blue Admin Dashboard button. Click it to access your administrative dashboard within the platform.
Congratulations, you are now an admin!
Screenshot 5 :

Screenshot 6 :
6) Configuring the AI Settings
To set up the AI for your platform, you’ll need the DEEPSEEK API key previously entered in the API Connector.
Access the Admin Page:
- Go to the main page of your new platform.
- Click on your profile picture in the bottom left corner to open the menu, and access the platform’s admin page.
Navigate to AI Settings:
- Once on the admin page, access the “AI Settings” from the sidebar menu.
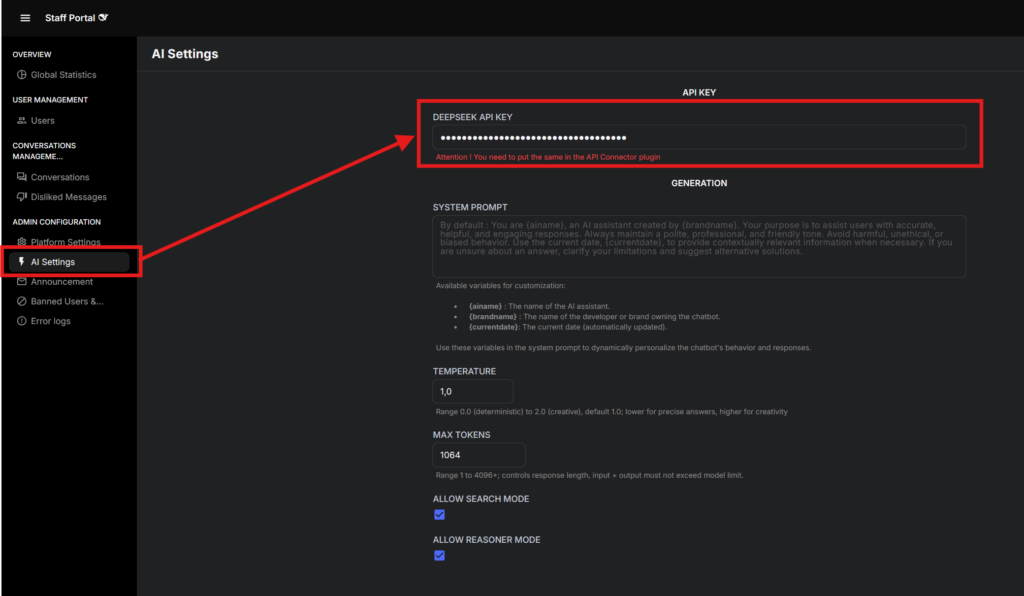
Enter the API Key:
- On the AI Settings page, you’ll see fields for “API KEY” as shown in the screenshot 7.
- Fill in the “API KEY” field with the same API key you used earlier in the API Connector.
Congratulations, your AI settings are now configured!
Screenshot 7 :
Perfect! You have completed all the essential steps necessary for the successful operation of your new platform. Below, you will find optional guides designed to further enhance and customize your platform.
Accessing and Modifying Style Variables
To customize the look of your platform by adjusting the color scheme and font, follow these steps carefully to ensure you only change the intended variables.
Navigate to a Page in the Editor:
- Open any page of the template in the Bubble editor.
Access the Style Variables:
- Go to the “Styles” section.
- Select “Style Variables” to view all the customizable style elements of the template.
Modify Color Variables:
- Scroll through the list to find the color variables.
- Focus on modifying only the following variables to tailor the color scheme of your platform:
- Dark Ascent
- Dark Background
- Dark Darker Background
- Primary
- Success
- Alert
- Destructive
- Ensure you do not change any variables outside of these specified to maintain the integrity of the template’s design.
Change the Platform’s Font:
- In addition to color variables, you can also modify the font used across the entire platform. This option is available within the same “Style Variables” section.
- Select the font setting and choose your desired font to create a consistent look that matches your brand’s aesthetic.
By following these steps, you can effectively customize both the color and font aesthetics of your platform to better align with your brand or preferred style.